Self-Hosting Email Experimentation
Today I decided that I will try setting up my own email service at home using a combination of Stalwart, SWAG (an NGINX w/ some extras baked in), and AWS SES. Now the method I’ve chosen mixes a lot of technologies; It also took me a few days of banging my head on the desk and running into numerous roadblocks, but I think I’ve found the solution that I’ve been after that is both functional and secure as well as low maintenance with minimal headaches.
Project Goals
When I set out on this project I had the following goals setup in order of presence:
- A Reliable email host that I can send and receive emails to everyone I need to
- A Secure way of sending, receiving, and storing emails so that others cannot intercept or read them
- A low maintenance/effort solution that I can “set and forget” for the most part and just coast the rest of the time
- Must be able to run in my home environment, keep all parts out of cloud/online providers when possible
Why Self-host?
Privacy
There’s a number of reasons I’ve decided to go down the road of self-hosting my email. I know it’s a “harder” thing to do, but I think from a privacy point of view it’s really the only way you can secure your own emails. Unfortunately with this method you will still need to rely on others to deliver your emails and they technically MITM your emails in the process. More on this in the AWS section.
Google has long since been known for harvesting your data. They use your data to analyze you, train their AI models, and sell ads to you. Due to these practices I decided to switch to Proton Mail because, at the time, they were more privacy and security focused. Because of the aforementioned google reasons, I have decided to not use google’s “free” SMTP relays for my mailing project and used AWS SES (simple email service). I know Amazon probably also harvests my emails, but I feel more safe with Amazon than Google (Famous last words 😅). There, however, is a downside to SES: it’s not being free. So keep that in mind if you decide to go down this route. It should be noted that if you sent less than 1000 emails you will be charged cents, so it really isn’t a large fee to use this method.
Proton Mail
I have used Proton Mail for years now, I actually have a Visionary plan with them (with 5TB of storage!). Unfortunately due to recent comments from the Proton CEO about his political stances I’m not sure how safe and private my emails are in their environment. Big tech, recently, has seemed to be ok with handing data over to the new administration and working with them. Because of this I started looking at some alternatives.
Learning
I’ll be honest, before this whole process I really didn’t know how email actually worked, so this was going to be a really good learning experience for myself and potentially others (like you fellow reader!). There are a lot of technologies that keep your email safe and that go into preventing spam from hitting your inbox. These include: DMARC, DKIM, SPF, ARC, DNS, DANE, IP reputation and others. I’ll cover them more in a different section, but these are just the security/anti-spam aspects. Then there’s the actual protocols that power email: SMTP, IMAP, JMAP, POP3. Watching the stalwart logs is mesmerizing. The messages and handshakes of each of these protocols in addition to actually sending and receiving email is fascinating! It brings you back to the very early days of the internet because these things haven’t really changed much since then (unfortunately)!
Why Self-Host Wrap up
To wrap up my justification for self-hosting, I wanted a platform that I know isn’t being spied on, being used to train AI/LLMs, or at threat to being delivered to authoritarian governments 😳. The only way that I found to meet these goals at of the time of this writing is to self-host. Below I’ll go over the architecture I’ve decided to use for this whole fiasco and the roadblocks I ran into.
Email Architecture
Below is the architecture diagram I am using for my email service. As you can see there are some external dependencies on AWS SES that I will explain later. The final architecture diagram outlining the software selected for this project and network flow in and out of the cloud and my home network.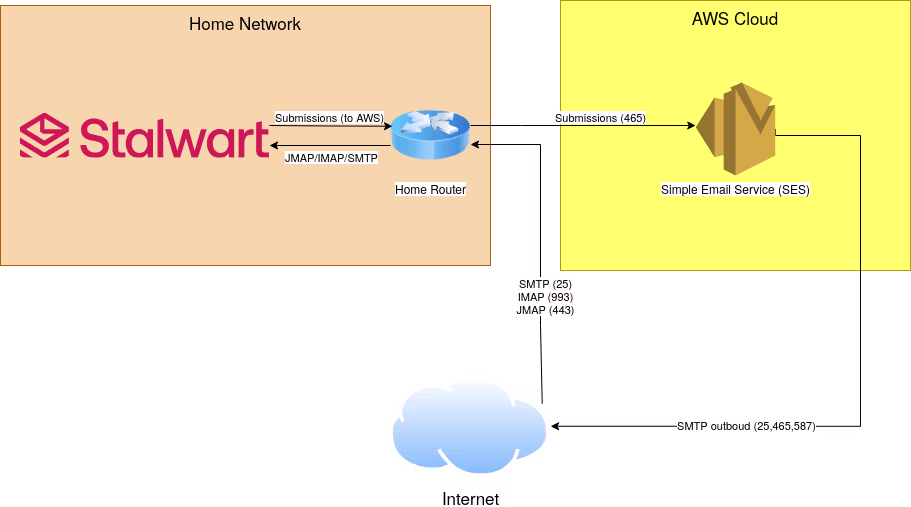
Internal Email Architecture
On my self-hosted side I just have the Stalwart server installed (Still deciding if a front-end is wanted/needed). I only have the ports open that I need for receiving and sending mail, these ports are: 443, 25, 993, and 465. These ports are, respectively, JMAP/Admin Web portal, SMTP, IMAPS, and submissions. The reason I don’t have submission, IMAP, and POP3(S) opened are I don’t really need them. Why expose ports and more potential attack surface than I have to? To break these down further, I use JMAP/IMAPS for reading my emails when I am out and about with my email clients on my phone or laptop (and not using my VPN). SMTPS and submissions are both used to send emails from my email clients. I don’t have port 587 open because I use implicit TLS (submissions) when sending since it’s more secure than STARTTLS. I also don’t have POP3 open because it’s an inferior protocol to IMAP and JMAP.
External Email Architecture
I initially decided to fully host on-prem and it appeared to work at first. I had SMTP setup for receiving and submissions to send and I could transmit emails to my gmail and proton mail accounts and receive from them. But, of all the email services to not work Yahoo blocked receiving my emails! Seriously, I can’t convey how shocked I am that Yahoo of all email services rejected my emails.. This was after I had everything setup that I could: DMARC, SPF, DKIM, MX records, etc. Since email is still a very important service used today and I do not want any of my emails to be rejected from family, recruiters, my job, etc. I really needed this to work everywhere!
Now, ironically, I did the whole spiel at the beginning of this post about not wanting big tech to read my emails for AI or other reasons. But I also stated that my #1 goal was to ensure that everyone can send and receive emails from me. So, unfortunately, I had security take a back seat on this one item and opted to use a SMTP relay. A relay does exactly what the name implies, it relays my emails from me to another email service acting as a middleman. Google offers free SMTP relays that you can use your gmail account with some restrictions, but as stated earlier, Google definitely collects these emails for their own benefit. AWS, however, may also do the same thing, but I feel a little more trust towards them since AWS is not a “free” consumer service. Netflix and other large companies use SES to blast out their marketing emails so I feel that AWS is less likely to collect their emails for nefarious or monetization purposes unlike google would.
You can also look at SES FAQs which seems to imply that they only scan messages attachments for malware and run it through a spam filter: We use in-house anti-spam technologies to filter messages that contain poor-quality content. Additionally, we scan all messages that contain attachments to check for viruses and other malicious content.
However it does look like they’ve changed their verbiage over the years to imply that they may be collecting more data than they used to. For example in 2020 their FAQ stated: We use in-house anti-spam technologies to filter messages that contain poor-quality content. Additionally, we scan all messages that contain attachments to check for viruses and other malicious content. These processes are completely automated with no human involvement. We only access email content in certain circumstances, such as when we’re troubleshooting delivery issues or investigating fraudulent or abusive activity.
This implies that they may not be using a fully automated system or that they have expanded the circumstances they will access emails (LLM training?)
Even further back in 2018 they seem much more concerned about privacy for their clients than 7 years later: We take our privacy and data protection policies very seriously. Amazon SES uses in-house anti-spam technologies to filter email messages containing poor-quality content and prevent them from being sent. Additionally, all messages that contain attachments, whether outbound or incoming, are scanned for viruses. These are automated processes with no human involvement. Amazon SES will only access email content under very limited circumstances, such as system troubleshooting, or investigating fraudulent or abusive activity. Furthermore, other Amazon SES customers do not have access to your email content.
This is the only external dependency for my setup, and it’s only there to ensure email deliverability and essentially “boost” my reputation.
Cost
I may not have mentioned it, but I am super cheap and wanted this project to be as free as possible (secret 5th goal!). That’s why I am using the free version of Stalwart and self-hosting it. That way I only have to pay for electricity and my ISP for internet (This also may or may not violate the Spectrum residential internet agreement….). But, since email is a critical resource I will sacrifice a few bucks in order to make sure I can properly send and receive emails. AWS SES has a free tier that you can use for the first 12 months of using it. This allows you to send/receive 3,000 emails per month. I will never come close to this limit, especially because I am only sending through SES.
Once this free tier expires after the first 12 months I will be on the hook for the bill. However, this is not a lot; probably less than $1/month. Amazon SES Pricing With Amazon SES, you pay only for what you use with no minimum fees or mandatory service usage. You are billed separately for sending and receiving emails, data usage, and additional features. Amazon SES provides billing transparency and low prices because you only pay for the features you use. * You might incur additional data transfer charges for using EC2 ** An open ingress endpoint offers exclusive resources, allowing customers to receive emails directly to their domain. Additionally, we provide a complimentary authenticated ingress endpoint that only accepts emails from credentialed senders. *** Email processing refers to emails processed by Mail Manager regardless of inbound receiving or outbound sending. **** You might incur additional data transfer charges for moving your sending workload to your second configured Global Endpoints Region. ***** You can use the Amazon Web Services Monthly Calculator to estimate your monthly charges for using Amazon SES. Please note that the pricing calculator does not currently include SES Free Tier discounts.Service type Price Additional charges Outbound email $0.10/1000 emails $0.12 per gigabyte (GB) of data in the attachments you send* Global Endpoints $0.03/1000 emails On top of base sending price only when sent through multi-region endpoint ID**** Inbound email $0.10/1000 emails $0.09 for every 1,000 incoming email chunks (see Pricing details for more information) Mail Manager -Open ingress endpoint** $50 per month per endpoint -Email processing*** $0.15/1000 emails $0.09 for every 1,000 incoming email chunks (see Pricing details for more information) -Archiving $2 per GB of emails ingested $0.19 per GB per month for storing and searching the archive -Email add ons Varies based on the add on solution you choose Amazon Connect email $0.05 per email Learn more on the Connect Pricing page
So, I would probably incur like 25¢/month:
- 10¢ for the first 1000 emails I send
- maybe 12¢ for a GB of attachments/month
This small cost is more than worth the time I save from having to deal with the maintenance mentioned above. I’ll come back and add an update for when I actually start incurring a cost for SES.
Setup
Here are the steps and sources I used to configure Stalwart and the AWS SES SMTP relay.
AWS SES
This process was also pretty straightforward and painless. Login to your AWS account and navigate to the SES page in your AWS console. Under the “Get Setup” page it will walk you through everything that you need to get setup so you can use SES as a relay service.
Setup an AWS SES Identity
Setup Identities for your domain, it will ask you to add a DNS record to your domain to prove you own it. This is done through your DNS provider (I use CloudFlare for my DNS). The completed verified DMARC, DKIM, and MAIL FROM settings for my AWS domain identity.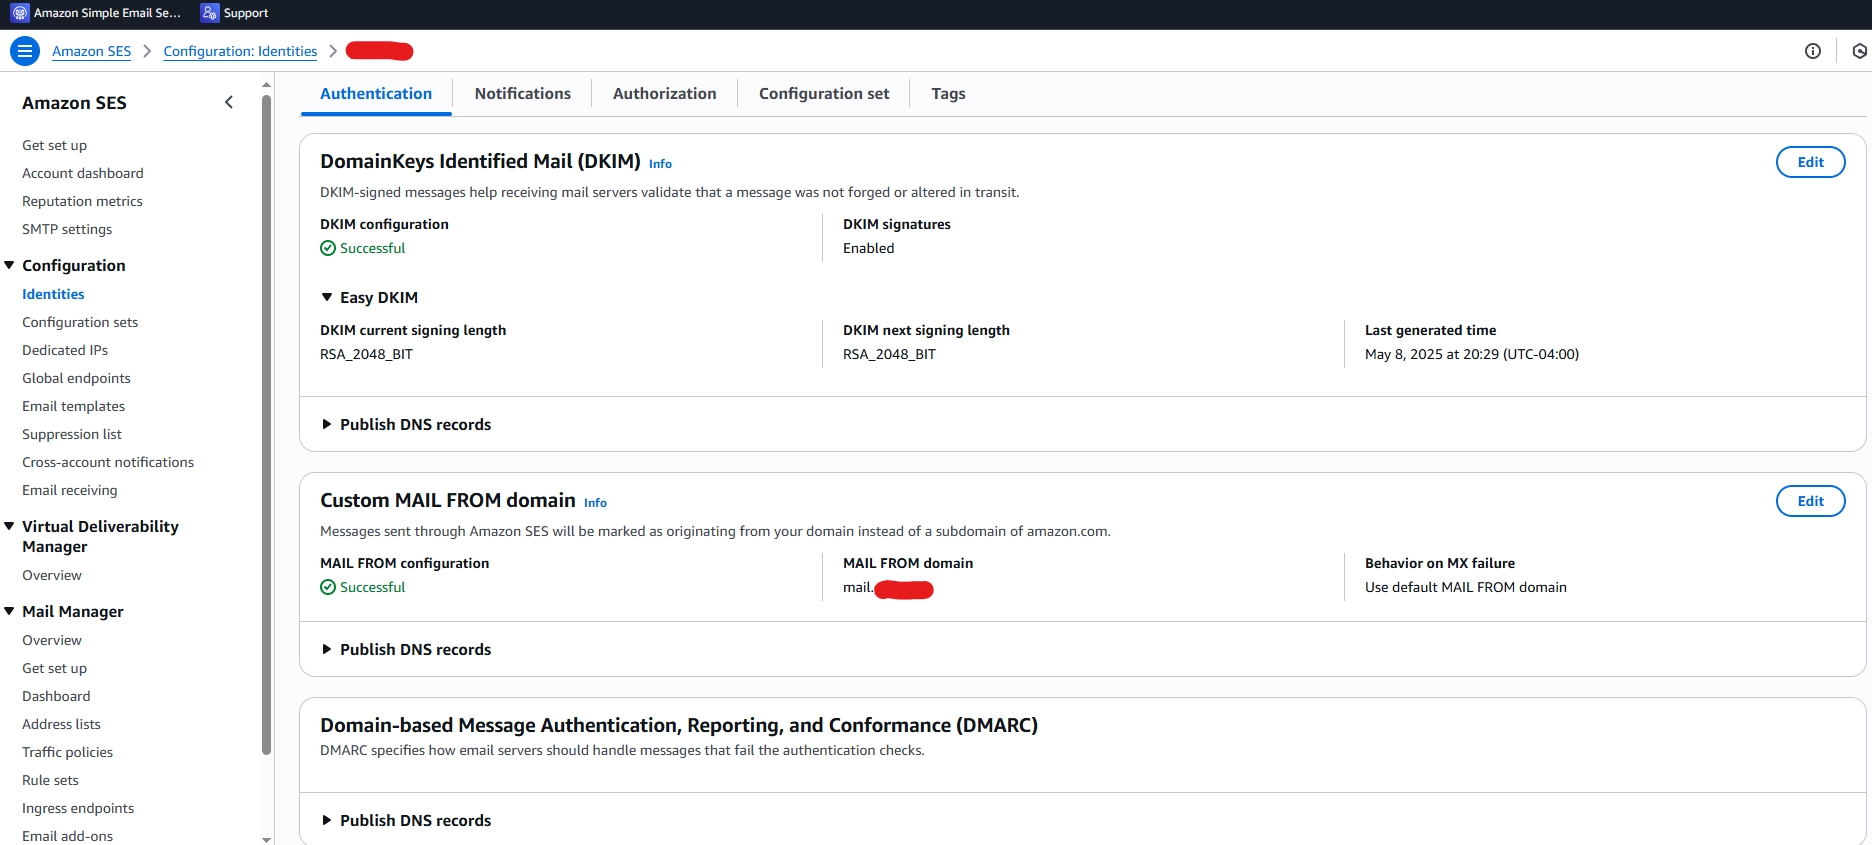
Setup AWS DNS Records
Once you get your domain verified you will then be given the options to enable DKIM, a custom MAIL FROM domain, and DMARC. I highly HIGHLY recommend you get all of these setup. This will lower your spam score and make it more likely your email will make it through to the receivers you are attempting to reach.
*These are all done through DNS records, so this whole process is pretty painless. I would recommend you add ALL of the AWS DNS records.*
Create AWS SES SMTP Account Credentials
After your account records have been added you need to create a SMTP user account to login to their SMTP relay. I used their implicit TLS SMTP port (465) because I want full end-to-end encryption (no STARTTLS). How you can request a SMTP account to configure your Stalwart SMTP relay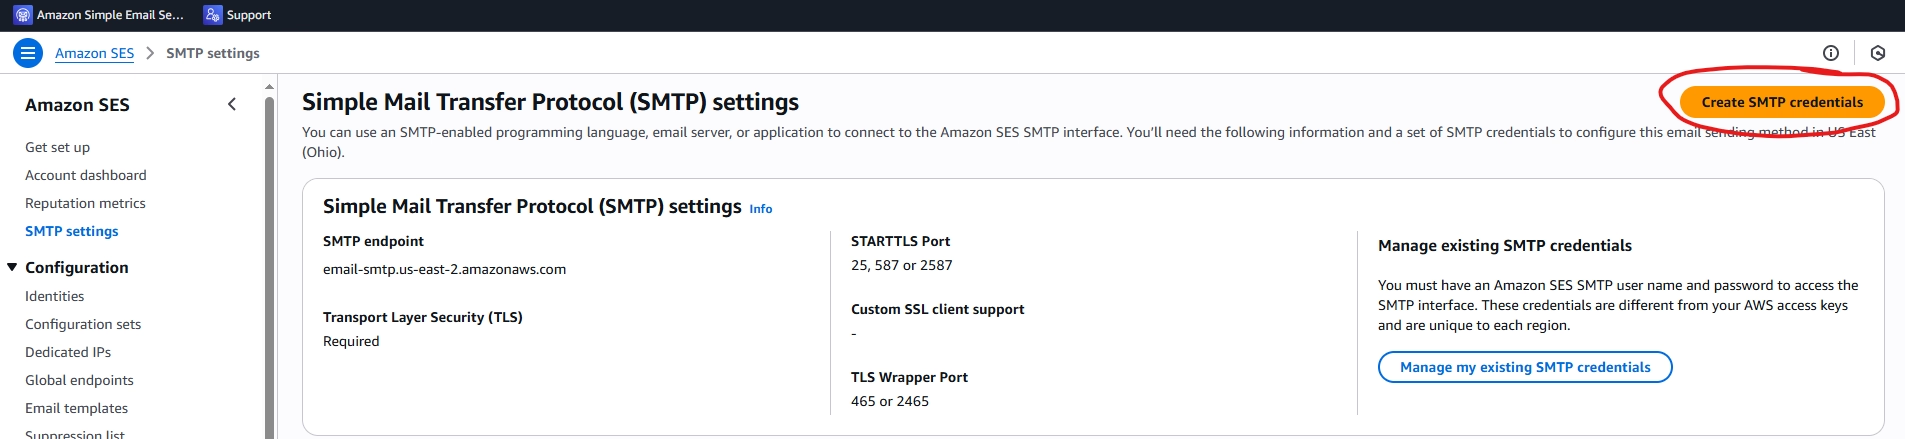
You will then need to apply to get your SES account moved out of their sandbox and into the production SES. This is done by submitting a request on the “Get set up” page. When I requested access I followed this Mark Falk’s blog post, who’s method I almost went with but thought SES was a better solution for me vs maintaining a EC2 instance with a wireguard server. Once again, it’s probably a little less secure since DNS is managed by Cloudflare vs myself and AWS controls the SMTP relay vs myself, but ease of use, and maintainability are more important to me. But, his post had a really good pre-written request that I copy-pasta’d, but tweaked it a little because he was asking for port 25 being unblocked for his EC2 and I was asking for production access in SES. My modified request using Mark’s template was as follows:
Initial Request through AWS’s form: Production access request Service: SES Sending Limits Region: us-east-2 Please enable production access
After submitting this a Support Case was opened that asked for more details and I submitted this (using my modified template from Mark): Hello, I am requesting SES production access for this account which is used to self-host a personal mail server for my family’s domain. The mail server is based on Stalwart Mail and is configured similarly to the solutions outlined in AWS’s blog post on deploying an open-source mail server: https://aws.amazon.com/blogs/opensource/fully-automated-deployment-of-an-open-source-mail-server-on-aws/ The intended usage is to send and receive a small volume of legitimate personal emails within my family. This setup does not involve bulk emailing, marketing, or unsolicited mail. To ensure compliance with AWS policies and prevent misuse, I have implemented the following security measures: SPF, DKIM, and DMARC records are properly configured to authenticate outgoing emails. The mail server enforces rate limits as well. Logs and monitoring tools are in place to detect and mitigate any potential abuse. I appreciate your consideration of this request and am happy to provide additional details if needed.
Access was then granted to production after a few days. Keep in mind that AWS support for free tiers are business hours on weekdays only so I had to wait all weekend to get my approval since I submitted it on a Friday afternoon.
SWAG (nginx)
At home I have a webserver that I use called SWAG from linuxserver.io that behaves as a reverse proxy for my homelab services. SWAG is essentially nginx with some pre-configured services and SSL stuff out of the box. It also handles the TLS certificates as well (I;ve chosen to use Let’s Encrypt). Since I already have SWAG setup and proxying other apps at home, I decided to proxy my Stalwart mail through the reverse proxy to keep from opening more ports to other containers on my container host. I’ve written about the issues I had with this further down but I eventually found the below working setup.
For the traditional email services to work I had to use nginx’s stream module. So make sure nginx is compiled with stream support before attempting this part (run nginx -V and look for --with-stream somewhere in the output). I proxy my IMAP, SMTP, and submissions traffic using the stream setup. This required changing some SWAG configs to get this to work because SWAG relies on the http module and doesn’t have any stream configs out of the box.
Below is the single line change I had to add to the /config/nginx/nginx.conf file:
events {
...
}

# Stalwart config
include /config/nginx/stream-confs/*.conf;

http{
...
}
After inserting that line of code into the nginx.conf file you will need to create the new directory /config/nginx/stream-confs and then add your new stream file there. I called mine stalwart.subdomain.conf to keep the naming convention of SWAG. This is assuming you are using mail.example.com for your setup. Make sure to change mail to whatever host you are deploying your mail server under.
This was the configuration that ended up working for me:
stream {

    # Proxy SMTP
    server {
        server_name mail.example.com;
        set $upstream_host <your stalwart container name>;
        set $upstream_port 25;
        listen 25;
        proxy_pass $upstream_host:$upstream_port;
        proxy_protocol on;
        proxy_ssl_verify off;
    }

    # Proxy IMAPS
    server {
        server_name mail.example.com;
        set $upstream_host <your stalwart container name>;
        set $upstream_port 993;
        listen 993;
        proxy_pass $upstream_host:$upstream_port;
        proxy_protocol on;
        proxy_ssl_verify off;
    }

    # Proxy SMTPS
    server {
        server_name mail.example.com;
        set $upstream_host <your stalwart container name>;
        set $upstream_port 465;
        listen 465;
        proxy_pass $upstream_host:$upstream_port;
        proxy_protocol on;
        proxy_ssl_verify off;
    }
}
You’ll notice that proxy_protocol is enabled for these 3 services. Be sure to enable proxy_protocol on your stalwart server, outlined in my Stalwart steps below.
I then setup HTTPS/JMAP using the http module with the following config file at /config/nginx/site-confs/stalwart.subdomain.conf:
server {
    listen 443 ssl;
    listen [::]:443 ssl;

    server_name .example.com;

    client_max_body_size 0;

    location / {
        include /config/nginx/proxy.conf;
        include /config/nginx/resolver.conf;
        set $upstream_app <your stalwart container name>;
        set $upstream_port 443;
        set $upstream_proto https;
        proxy_set_header Host $host;
        proxy_set_header X-Forwarded-For $proxy_add_x_forwarded_for;
        proxy_set_header Forwarded $proxy_add_x_forwarded_for;
        proxy_set_header X-Forwarded-Proto $scheme;
        proxy_pass_request_headers on;
        proxy_pass $upstream_proto://$upstream_app:$upstream_port;
        proxy_ssl_verify off;
    }
}
After a nginx -s reload or restarting the container you should be good to go! To see why I didn’t fully use the proxy_protocol and instead configured nginx to use the http and stream modules, I explain it further below.
Shared SSL certificates
I also decided to use the SWAG container’s SSL certs for my Stalwart container. You can create a shared volume so that the Let’s Encrypt certificates are passed to the stalwart container as well. For the SWAG container I created a shared volume on: /config/etc/letsencrypt/archive/example.com/. This will pull in the fullchain1.pem, cert1.pem and privkey1.pem files into a shared container. When you do this you will need to add example.com, mail.example.com, autoconfig.example.com, autodiscover.example.com and mta-sts.example.com to your EXTRA_DOMAINS env variable so your cert will get your mail server as Alternate DNS names. I’ll outline how to set this up in Stalwart by passing the shared volume and in the stalwart configuration.
Stalwart
I am using the docker container for Stalwart, so this was very straightforward. Setup instructions here: https://stalw.art/docs/install/docker.
This part was probably the most painless part. Just setup the container, login with the admin password it gives you when you first start it, add your custom domain and it will spit out the DNS entries you need to add; More on this later. Once you’ve done that you can add your own account. I recommend name@domain.com as the username because all JMAP clients appear to expect the FQDN for a username in order to work. I’m not sure if that’s just a limitation of the JMAP email clients that I’ve personally tried or a requirement specified by the JMAP protocol. Either way I had to change my login from name to name@domain.com to log into to any of my JMAP clients properly.
I also had to configure my Stalwart instance to use the AWS SES SMTP relay in order to get my emails visible. Do this after you have your AWS SMTP user account created. This was done by using this reddit post: Relay example. Don’t forget to authenticate or anything and don’t just allow relay for every and anything.[session.rcpt]
relay = true
[queue.outbound]
next-hop = "'aws'"
[queue.outbound.tls]
mta-sts = "disable"
dane = "disable"
starttls = "require"
allow-invalid-certs = false
[remote."aws"]
address = "AWS"
port = 465
protocol = "smtp"
concurrency = 16
timeout = "1m"
[remote."aws".tls]
implicit = true
The other setting I’ve configured is to add custom sub-accounts using a . character instead of a + character. This is more of an anti-spam thing that I am trying over a catch-all email. I, personally, haven’t experienced an issue with a catchall account on my previous Proton Mail domain, but maybe Proton’s spam filtering was just really good. So I followed the Stalwart documentation for Address rewriting to setup my custom address rewriting scheme. I used their example and used . because I feel as though spammers are looking for the obvious ones such as the + syntax (Plus Addressing) rather than a . since some companies or legitimate addresses use . in their addresses such as first.last@example.com.
I’ve also done the additional step of flipping the account and alias as well, so it’s <alias>.account@example.com, further obfuscating the known “Plus Addressing” scheme that google uses for their email service – address+<alias>@gmail.com. But you can change this to use any character you’d like such as _, it’s just a regex pattern.
Note on DNS
Just a note, I had to merge the DNS entries given to me from AWS and Stalwart to get my setup working. I ended up setting these DNS from the Stalwart domains section and then using the AWS ones for everything else:
- A example.com <MY IP>
- A mail.example.com <MY IP>
- CNAME autoconfig @
- CNAME autodiscover @
- CNAME mta-sts @
- SRV _imaps._tcp 0 1 993 mail.example.com
- SRV _jmaps._tcp 0 1 443 mail.example.com
- SRV _submissions._tcp 0 1 465 mail.example.com
- TXT _smtp._tls <v=TLSRPVv1; …>
- TXT example.com <v=spf1 mx …>
- TXT _mta-sts <v=STSv1; …>
These Stalwart DNS entries are how you tell external email senders to send emails directly to your self-hosted Stalwart SMTP server and not the AWS SES. But the DMARC, DKIM, and MAIL FROM entries provided by AWS SES allows SES to, I believe, spoof your SMTP server when it forwards your email to your recipients. This way it appears that you are the one sending the email to the receiver vs AWS SES. But you get the full benefits of AWS SES such as their high reputation IP addresses and other security and anti-spamming features that keep you off of your recipients spam folders and reduce the likelihood that your emails don’t get delivered in the first place.
Proxy Protocol Setup
If you are using the Proxy Protocol behind a reverse proxy you will need to enable the proxy protocol on the Stalwart server for each service that goes through your reverse proxy. Here’s the kicker though, I am using the proxy protocol for all services EXCEPT for HTTPS. Because of this you should not enable the global proxy protocol in stalwart. It took me forever to figure out that you can’t globally enable it but then disable it for a single service. The global settings is treated as an all or nothing, meaning you can’t globally enable and then disable just HTTPS while everything else uses it. So, only enable Proxy Protocol on IMAPS, SMTP, and submissions listeners in Stalwart. This way HTTPS (443) will not use proxy protocol and cause you issues when you are trying to use JMAP and the administrative interface.
Shared Let’s Encrypt certificates
If you decided to do this, make sure you follow the shared volume instructions outlined in the nginx config section first. If you used the mount I shared above I mount this in the stalwart container at: /opt/stalwart-mail/etc/keys. If you have SELinux enabled, make sure you have this volume properly configured to be shared between the 2 containers.
I then added this configuration to my config.toml:
certificate.default.cert = "%{file:/opt/stalwart-mail/etc/keys/fullchain.pem}%"
certificate.default.default = true
certificate.default.private-key = "%{file:/opt/stalwart-mail/etc/keys/privkey1.pem}%"
This will then enable Stalwart to use your Let’s Encrypt certificates (make sure to add your hosts to the Alternative DNS names for your certificate!). This will ensure that all of your stalwart services (IMAPS, SMTP, IMAPS, submissions) are using your valid SSL cert that is auto-renewed when your reverse proxy does so..
Issues
Yes, the best part of this blog. The issues I ran into! If you skipped all of the setup and preamble, this should be the part that you are reading so you don’t run into any of the issues that extended this into a multi-week project. If you stick to my configurations and steps above this should take you 2-3 days tops. Most of that should be just waiting for AWS to approve your production access.
Proxy Hell
I can’t tell you how long it took me to figure out that I you can’t bind 2 different modules to the same port. In this case port 443. I already use this reverse proxy for other applications I run at home, so (out of the box) SWAG/nginx uses the http module to bind to port 443 and 80.
My reasoning for why I could bind the http and stream modules to 443 was because I had different nginx virtual servers setup with different hosts. So in my mind the stream module binds to the .example.com virtual server, while the http module binds to the .example.org virtual server. They’re different virtual servers, so this should work right? WRONG!.
This ended up crashing my nginx server every time I would reload nginx’s config, making me think that I just had a bad config somewhere not that the config was literally not runnable. For some reason it was hard for me to google this solution as well because there were some workarounds like using different ports, or trying to bind 2 IPs to the NIC, etc. In the end I evenually found this stackexchange answer that set me straight that. It boils down to: you cannot bind 2 nginx modules to the same port on the same IP.
I’m sad to admit that this took me like 3 days of troubleshooting in my free time to figure out. That’s why in my setup I configure stream for everything, but use a normal proxy_pass for the https.
Delivery issues
So when I first started this project I indented to own the whole process end-to-end in my homelab. This fell apart up when Yahoo mail, of all things, rejected my outgoing mail. YAHOOOOO! This was after I did everything I was “supposed to”. I setup DMARC, DKIM, SPF, etc. It turns out that some email provides use what’s called a PTR (or reverse DNS (rDNS)) lookup to also help verify that you are who you say tou are and not a spammer. Since I was hosting this at my home I was using Spectrum’s variable DHCP address. rDNS or PTR records are exclusively owned by the ISP and you have to work with them to get it changed. They do not support changing these to match your host name unless you pay for a static IP and their business internet, which I did not want to do. I like my cheaper residential internet, thank you very much.
Because of the dynamic IP mentioned above there’s also the issue of spam lists. When I checked my IP it was not on any major spam lists, but I was on a couple that track all consumer DHCP pools (including Spectrum’s residential IPs) as well as all of the AWS/GCP/Azure VM subnets. This may also contribute to some delivery issues and your emails getting rejected.
You can fix both of these issues by appealing with every email provider that has banned your IP and getting your IP whitelisted on their list. This can be a very tedious process because there happen to be a lot of email providers. I’ve also read it’s hard to get appeals for the larger email providers such as Microsoft, Google, and especially Yahoo. Also, if your IP changes: guess what? You’re back to square one of being banned and you have to re-appeal your new IP again. So, this process may be worth it if you are hosting behind a static IP and you don’t have to worry about it changing. Because that would be a major headache of trying to ensure your IP is not blacklisted with every major email provider.
There’s also another thing known as “IP reputation” when it comes to your SMTP host. As you send more emails to other email providers your domain/IP builds a good reputation with them. This will keep you above their spam reputation limits and will keep your emails from being rejected. Unfortunately these typically require you to send a lot of emails (more than a typical casual user would) to remain in good standing, so this may also lead to you being rejected/spam’d. I’ve also read that new “fresh” IPs that haven’t been blacklisted start off with a negative reputation score. So you literally have to work up to a 0 score and then further work up to a positive score. Kind of insane that SPAM has gotten us to this point.
The ultimate fix for these issues I ran into is to use AWS SES as my “trusted and reputable” SMTP relay. This fixes all of the issues about building reputation, PTR records, spam lists, etc. Amazon takes care of all of that hard work and I can just piggy back off of their work. As mentioned though the potential downside of that they can see all emails I am sending. There are other services such as MXroute I may look at in the future.
Wrapup
To summarize this was a long multi-week project for me. But I think it has really expanded my knowledge on SMTP and email in general. I also learned more about NGINX, traffic proxying and patterns as well as playing around with DNS and AWS Cloud.
I would recommend this to someone who is of moderate IT experience that’s looking for a challenging project to learn about multiple core IT disciplines (networking, DNS, cloud, smtp, firewalls, web). I’ll write an update after starting to transition my emails to my new service. I currently have 257 email aliases that need to be migrated 🫠.